Pages

Friday, July 30, 2010

Cinnamon Raisin Biscuits


These are one of my son's favorite breakfast treats.  They are easily made with the help of a food processor.  Why don't you give them a try in the morning?

3 cups all-purpose flour
1 tablespoon baking powder
1 teaspoon salt
1/4 sugar
2 teaspoons ground cinnamon
3/4 cup unsalted butter
1 cup raisins
1 cup milk
melted butter
1 cup sifted powdered sugar
1 - 2 tablespoons 1/2 & 1/2

Preheat oven to 400 degrees.  Combine first 6 ingredients in a food processor.  Pulse several times to mix.  Add cold butter cut into 6 equal parts.  Add to dry ingredients in food processor.  Pulse several times until mixture is crumbly.  Transfer to large bowl.  Add milk and raisins and stir until moistened.  Knead dough on lightly floured surface 4 or 5 times.  Pat dough to 1 inch thickness.  Cut with biscuit cutter.  Placed on greased cookie sheet.  Brush biscuits with melted butter.  Bake for 14 - 16 minutes until lightly browned.  Drizzle with glaze made of powdered sugar and 1/2 & 1/2.
Yield 15 - 2" biscuits
Take a button as a reminder
to come back Sunday for our
PRETTY PACKAGES PARTY


<a href="http://blackberryvine.blogspot.com/2010/07/lets-have-party.html"><img src="http://farm5.static.flickr.com/4143/4817092716_6184df5a0c_m.jpg" />

Wednesday, July 28, 2010

Beachy Keen Handprints

On a beach trip two summers ago, I decided to try an idea I found in Family Fun magazine.
Click here for their tutorial.
Of course, theirs was way "prettier" than ours, but hey, for a 2 & 3 year old, they turned out pretty good!

In a small card board box, I put  4 premeasured bags of plaster of paris and a measuring cup.  I was so glad I had the box, because I hadn't thought about how I was going to get the handprints back home...they can be a little fragile, but nothing E6000 can't put back together!  We started by making handprints in the sand.  Be sure the prints are deep enough to hold the plaster.  Then we added some seashells that we found on the beach.  Next, we mixed the plaster with sea water and poured them into our molds.  I put bent paperclips on top of the molds so I could easily mount the handprints later.


It doesn't take long for them to set up.  We went for a walk & they were ready when we got back.  I picked them up, put them in my box, and left them there for a couple of months.

The Family Fun example has them mounted on sticks on driftwood.  Very cute, but not practical in my house of toddlers.  I found a barnwood frame at Hobby Lobby for 1/2 off.  I sprayed the back with spray adhesive, put a beautiful sea blue linen down, added some small nails and mounted the handprints.  The info about the trip is written on the back of the frame.
All in all, it is a sweet little keepsake of a fun trip to the beach!
DON'T FORGET TO COME BACK SUNDAY
FOR THE PARTY!
TAKE A BUTTON FOR A REMINDER!


<a href="http://blackberryvine.blogspot.com/2010/07/lets-have-party.html"><img src="http://farm5.static.flickr.com/4143/4817092716_6184df5a0c_m.jpg" />
Linking to these fun parties:
Strut Your Stuff Thursday at Somewhat Simple
Show Off Your Stuff and Fireflies and Jellybeans
Under $100 at Beyond the Picket Fence
What are Little Boys Made of at seven thirty three
Sugar and Spice at seven thirty three
Whatever Goes Wednesday at Someday Crafts
Show and Tell at Blue Cricket Designs
The Shabby Nest
Friday Fun Finds at Kojo designs
Friendly Friday Follow
It's a Hodgepodge Friday
Feature Yourself Friday at fingerprints on the fridge
Look at Me I'm So Crafty at Fun to Craft
Frugalicious Friday at Finding Fabulous
New Friend Fridays with The Girl Creative and Trendy Treehouse
Fabulous Finds Friday at 6 inches of Ribbon
Sunday Spotlight at Under the Table and Dreaming
Sundae Scoop at I heart Naptime
Weekend Wrapup at Tatertots and Jello
Crafto Maniac MONDAY
Just Something I Whipped Up Monday at The Girl Creative
Market Yourself Monday at Sumo's Sweet Stuff
Motivate Me Monday at Keeping It Simple
Making Monday Marvelous at C.R.A.F.T.
Anti-Procrastination Tuesdays at New Nostalgia
Take a Look Tuesday at Sugar Bee
Anything Related Tuesday at All Thingz Related

Follow Me on Pinterest

Tuesday, July 27, 2010

Look What I Got!

Last week I posted on a blog (Tator Tots & Jello) and entered a give-a-way (Bungalow Bath & Body)...not unlike many other days I've spent in blogland. 

Then, unexpectedly, I received an email from Jen at Tator Tots and JelloI won her give-a-way!  Me?!?!  Are you sure?!?!  I mean,  I DID win life's lottery when I married my husband and then we DID hit the jackpot with our two kiddos...but as far as actually winning items of monetary value (my husband and boys are priceless)....it just doesn't happen for me.  I was over the moon for D-A-Y-S!!!  It really IS fun to win!!!

Well, over the weekend, this glorious package of goodies arrived from Jen at Bungalow Bath & Body.
Trust me...the soaps and sugar scrub smell as good as they look!
Be sure to check out Jen's store on Etsy

Also, if you don't already follow Tator Tots & Jello
click the button to be inspired!
Visit tatertotsandjello.com

Take a button as a reminder
to come back Sunday for our
PRETTY PACKAGES PARTY


<a href="http://blackberryvine.blogspot.com/2010/07/lets-have-party.html"><img src="http://farm5.static.flickr.com/4143/4817092716_6184df5a0c_m.jpg" />

Monday, July 26, 2010

Wonderful White Cake Balls

White on white cake balls!
  White cake and cream cheese frosting covered in white chocolate candy topped with pearly white sprinkles.

They turned out beautifully.  Wouldn't they be gorgeous at a wedding reception?
Of course I had to dip a few in dark chocolate as well!
Beautiful addition to a  'Black & White' party.

For a perfect birthday party sweet, just add multi-colored sprinkles!
These are completely divine!
Take a button as a reminder
to come back Sunday for our
PRETTY PACKAGES PARTY


<a href="http://blackberryvine.blogspot.com/2010/07/lets-have-party.html"><img src="http://farm5.static.flickr.com/4143/4817092716_6184df5a0c_m.jpg" />

 Parties I'm linked to:
Under the Table & Dreaming - Sunday Showcase
Market Yourself Monday at Sumo's Sweet Stuff
Just Something I Whipped Up at the Girl Creative
Motivate Me Monday at Keeping it Simple
Making Monday Marvelous at C.R.A.F.T.
 New Nostalgia
Take a Look Tuesday at Sugar Bee
Anything Related at All Thingz Related
Sugar and Spice and Everything Nice and seven thirty three
Whatever Goes Wednesday at Someday Crafts
Show and Tell at Blue Cricket Design
Wednesday Gratitude at Heart and Home
White Party at 504 Main

Friday, July 23, 2010

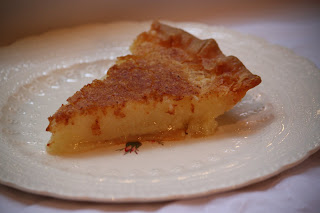
Buttermilk Pie

This recipe is my Nitaberger's recipe.  (Nitaberger is my mom's best friend.  Her "real" name is Juanita Birdwell.  As a little girl, it came out "Nitaberger" and well, it has stuck that way for 40 years!)
Nitaberger would (and I guess, still does) make this pie often...for get together and church luncheons.  To me, it is a comfort food like no other.  If you've never had or never made Buttermilk Pie...pie doesn't get any better or any easier than this!  Enjoy!

Nitaberger's Buttermilk Pie
2 cups sugar
3 eggs
1/2 stick butter
1/4 cup flour
1 tsp. vanilla
3/4 cup buttermilk
nutmeg (I use freshly grated, but fresh from the spice rack will work, too!)

9 or 10 inch unbaked pie shell

Mix sugar and flour. Melt butter. Stir the eggs into the sugar mixture, mix in buttermilk and butter. Stir until well mixed . Pour into pie shell, and sprinkle nutmeg on top. Bake 325 degrees for 45 minutes.

I like to eat mine cold out of the fridge, but its delicious warm, too.

Don't forget to grab the button for our Pretty Packages Party August 1st thru August 7th.


<a href="http://blackberryvine.blogspot.com/2010/07/lets-have-party.html"><img src="http://farm5.static.flickr.com/4143/4817092716_6184df5a0c_m.jpg" />

Wednesday, July 21, 2010

Let's Have A Party


Have you seen this beautiful book?  Presentations by Carolyne Rohem was a gift from my m-i-l and I absolutely LOVE it. You can purchase it at your local bookstore or Amazon and I highly encourage you to do so.  It is full of the most beautiful photographs of the most gloriously wrapped gifts.

What I have found, is that my friends that like decorating, entertaining, crafting and gardening also enjoy wrapping beautiful and interesting packages for their friends and loved ones.
Would you, my friends in blogland, want to share your beautifully wrapped gifts with the rest of us?
I hope so...so I'm going to host a little party Sunday, August 1st thru Saturday August 7th.
Any photo with a wrapped gift in it is eligible.
Gift bags, favor boxes, birthday presents, wedding gifts, Christmas presents or any other type of gift you can think of.
Please feel free to ask me any questions, leave suggestions or share thoughts about this new party.


<a href="http://blackberryvine.blogspot.com/2010/07/lets-have-party.html"><img src="http://farm5.static.flickr.com/4143/4817092716_6184df5a0c_m.jpg" />

Tuesday, July 20, 2010

Don't Lose Your Marbles!

First, let me say, my precious boys, four & six, are much better children than I deserve.
With that disclaimer out of the way, I needed an easy way to "keep up" with the positive reinforcement.
Also, I really didn't care for the "nagging" mommy I was becoming.
Well, to my delight, I found a possible solution in the June/July 2010 issue of Family Fun magazine.
A wise mother of 5 children came up with the idea of marble jars.
Each task/chore the children completed was assigned a number of marbles.  Easy tasks are worth 1 marble, more difficult or time consuming tasks are worth 2 - 4 marbles.
As tasks are completed, the children add marbles to their jar.  Once their jar is full, they can receive a special treat.  Ours treats are a date w/mom or dad, a book,  or an hour of Wii/computer/tv time.
So far so good...I'll let you know how this works out for us.
SMILES!!!

PS....scroll to the bottom to get the info for a new party I'm hosting in August!

Linked to:
Show & Tell Every Wednesday at Blue Cricket Designs

You're Invited to participate in our first ever PRETTY PACKAGES PARTY.  Take the button & code so you remember to come back the first week in August!


<a href="http://blackberryvine.blogspot.com/2010/07/lets-have-party.html"><img src="http://farm5.static.flickr.com/4143/4817092716_6184df5a0c_m.jpg" />

Friday, July 16, 2010

7 Layer Bars or Magic Bars


Ok, you might think it is absurd that I would share such a popular recipe with my friends in blogland, but then I remembered...I hadn't even had the pleasure of trying these until my 30's!!!  A sweet lady named Mary Rhea shared her recipe with me.  We worked together and she brought these for one of those "potluck" days.  She thought I was crazy the way I went on & on about them.  They are sooo easy and sooo good.

Sooo, if you've never had these, here is the way too simple recipe.  You can adjust the fillings to your tastes...I add extra coconut & pecans!  Enjoy!

1/2 cup butter
1 1/2 cups graham cracker crumbs (a sleeve)
1 - 14 oz can sweetened condensed milk
1 cup semi-sweet chocolate morsels (a 6 oz package)
1 cup english toffee bits
1 1/3 cups flaked coconut (3.5 oz can)
1 cup chopped walnuts (I use pecans or a mixture of the two)

Preheat oven to 350 degrees.
In a 13 x 9 inch baking pan, melt butter in oven.  Remove from oven; add graham cracker crumbs.  Mix well and press into pan.  (now, this is where I do it a little different from her recipe...add the sweetened condensed milk last...)  Pour sweetened condensed milk evenly over crumbs.  Sprinkle chocolate morsels, toffee, coconut and nuts on top;  press down firmly. 
Bake at 350 degrees for 25 - 30 minutes.  Cool completely on a wire rack.  Cut into squares and enjoy!

I made these a least a dozen times last summer when we were at my brother's ranch...easy to have all the ingredients with you and clean up is minimal.  Yummers!

Wednesday, July 14, 2010

Going Away Luncheon


First of all, let me start by asking you to forgive my photo-taking.
This was Pre-Blogging and I was just taking photos for myself to help me remember how I set things up.
My dear friend and neighbor was moving to Boston so I decided to host a little "Going Away Luncheon" for some of our other friends and neighbors.  I set out a tray with some pink paper & pens for the guest to write some special sentiments for my friend.  I also took pictures of her with each guest and made it all into a simple little keepsake for her.

I used an old Spode Pink Tower? sugar bowl for the flowers on the tray.
  There is no lid, so it is a perfect vessel for flowers.

I used some of the demitasse cups for smaller arrangements at each guests place setting.

The plates are Spode Billingsley Rose Old Mark on the Jewel shape plate.
The water goblets are all Waterford Simply glasses in lime, blue and pink.
The ice tea glasses are Ralph Lauren.
The silver is Gorham Chantilly.  (One day I'll do a post on my silver...it has a very special story behind it.)
The matelasse table cloth was loaned to me by my m-i-l.
She has soooo many pretty things.  To see a few, go visit her blog http://www.entertainingwomen.com/
My m-i-l also gave me the beautiful antique blue placemats and napkins.
For the centerpiece, I placed a silver tray on short cake stand and topped it with a Fitz & Floyd pitcher that I keep in my kitchen.  Most of the flowers came from, wait for it, the grocery store (collective GASP here.)
I supplemented with some roses and ivy from my garden.


Again, most of these photos were taken AFTER the luncheon...I will do better next time.

Linking to:


Tuesday, July 13, 2010

Monogrammed Flag

When I started to put away my 4th of July decorations I realized that I really liked the flags in the urns by the front door.  I didn't have any other flags to put in them, so I decided to try to make my own.
(Of course, I didn't take a before picture.  This one shows the flags a little, but it mostly shows some of the cutest kids on the planet! smiles!)

Let me also just put in a disclaimer right here. 
I did not take measurements...I just eyed it.  If you need exact measurements, this is not the "tutorial" for you. 

The items I used in making these flags were:
old flags, muslin, scissors, print out of letter, iron, sewing machine, acrylic paint, fabric medium, scotch guard, E6000 & fabric glue

First I cut out muslin about an inch wider than the flag on each side.

Then I folded over the top fabric (twice) to make a hem.  I iron each fold to make the sewing way easier.

Sew the hem closed.

I printed off the intial (Porcelain @ 720) and put it underneath the muslin.
(Martha says you can use an ink jet printer, print off the mirror-image, and iron it to the front.  It should leave enough of a mark that you can see it to easily paint over it.)

 I used acrylic paint mixed with fabric medium.  After it dries for 24 hours, then you heat set it.  I went over it with an iron.  Then I sprayed a light coating of scotch-guard on to make it a little more "all-weather."


I spray painted the tops of the flags black.  It doesn't need to be neat as you cover the dowel part with the flag.

When the "flag poles" were dry, I used E6000 to glue fabric to pole.  I made one turn of the pole, then added fabric glue to finish it off.  Once is was all dry it was ready to try out.
What do you think?

I'm linking to:
 mmm button


Beyond The Picket Fencegiveaways


Decor Mamma