Pages

Monday, February 28, 2011

Baby Sign for Hospital

My sweet friend is scheduled to deliver her precious baby boy on St. Patrick's Day!
When I saw Haley at the Autocrat's darling baby sign, I knew I had to make one for baby Jackson.

This adorable vintage image was at the Graphics Fairy.  I used the freezer paper technique to print it on some fabric...it is so sweet.

We'll have to wait until the 17th to fill out these!

I just HAD to put a shamrock on this!!  After all, it will be St. Patrick's day!

A little message on the back for sweet baby Jackson from his Auntie Jame-Jame!

Smiles!!!

Linking to:

Wednesday, February 23, 2011

Cinnamon-Streusel Coffee Cake

Oh Martha!  You've done it again!
Have you received your March issue of Living yet?
There is an article on coffee cakes and it doesn't disappoint!
My whole family LOVES coffee cake....especially homemade, (though my brother has me hooked on the Cinnamon Cream Coffee Cake at Corner Bakery!)

Anyway, Martha's recipe for Cinnamon-streusel Coffee Cake is similiar to many sour cream coffee cake recipes, but its better!  And I think I know why.  She uses COARSE salt in the topping and in the cake.  It adds a little crunch in the topping that gives it a wonderful salty sweetness that I just LOVE.

Martha also wants you to wait until it cools (yeah, right) before cutting it.  We didn't and it was DIVINE!  I also skipped the glaze and just dusted it with some powdered sugar ala Corner Bakery.
The picture above is of one of the last pieces (after it cooled.)  Very pretty!
She also gives a banan-coconut version, but you'll have to go pick up the magazine for that one!!  (Let me know if you tried it!)

Without further ado, here is the recipe!

Cinnamon-Streusel Coffee Cake
Streusel Topping
1 3/4 cups all purpose flour
3/4 cup light-brown sugar
1 teaspoon ground cinnamon
1 teaspoon coarse salt
1 1/2 sticks cold unsalted butter, cut into small pieces
1/2 cup coarsely chopped toasted pecans

Mix together first 4 ingredients.  Cut in butter using a pastry blender or your fingers.  Stir in pecans.  Refrigerate until ready to use.

Streusel Center
1/4 cup light-brown sugar
1/4 teaspoon ground cinnamon
1 cup coarsely chopped toasted pecans

Mix all 3 ingredients together.  Set aside.

Preheat oven to 350 degrees.

Cake
1 stick unsalted butter, room temperature
2 cups all-purpose flour
1 1/4 teaspoons baking powder
1/2 teaspoon baking soda
1/2 teaspoon coarse salt
1 cup granulated sugar
2 large eggs
1 1/2 teaspoons pure vanilla extract
1 cup sour cream

Butter a 9-inch tube pan with removable bottom.
Sift together flour, baking powder, baking soda and coarse salt into a bowl.  (My sifter wouldn't sift the salt...may want to sift first 3 ingredients then mix in salt.)
Beat butter and granulated sugar in mixer on medium speed until pale and fluffy (about 2 minutes.)  Beat in eggs, one at a time, then vanilla.  Beat in flour mixture in 3 additions, alternating with sour cream, beginning and ending with flour.  Continue to beat until well combined.
Spoon half the batter into pan.  Sprinkle streusel-center mixture evenly over batter.  Top with remaining batter, and spread evenly using an offset spatula.  Sprinkle streusel-topping mixture evenly over batter.
Bake until golden brown and a toothpick inserted into the center comes out clean, about 55 minutes.  Transfer pan to a wire rack and let cool completely.  (I didn't...still good!)  Remove cake from pan.

Sprinkle with powdered sugar or make a simple glaze out of 1 cup confectioners' sugar and 2 teaspoons whole milk.  Drizzle glaze over cake letting it drip down the sides.

Serves: 12

Enjoy!!
Smiles!!!

Linking to:

Thursday, February 17, 2011

40th Birthday Cake Pops

One of the sweet teachers at Jack's preschool turned 40 a few days ago.  With all of the ice and snow, they had to push back celebrating her birthday until today.  Some of her friends at the school wanted to do something special for her.  They asked the kiddos to wear black and to bring 40 items to put in a basket for her.
Jack brought these cake pops.


It can be a little difficult to find a vessel to hold all 40 cake pops...especially if you wait to the last minute (reads: this morning before school.)  I've been saving cans for another project, so I picked up a few and wrapped them in black construction paper.  Finished it off with a piece of silver ribbon and a quick label.
Not too shabby for a last minute container if I say so myself.

Happy 40th Sweet Mrs. Haley!!!
Thank you for all you do!!!

Smiles!!

Linking to:

Wednesday, February 16, 2011

The Pretty Packages Party Highlights

What a great party we had last week!
You are all making the world prettier, one package at a time!
A big THANK YOU to everyone who linked up!
Here are a few of my favorites:

What child wouldn't LOVE getting their birthday present in this clown box?


Sandy at Sandy's Space created this magnificent can for Chinese New Year.  It will hold the mandarin oranges that she delivers to friends and family as a good luck tokens.  Isn't it pretty??
 I LUV these sweet tic tac valentines by Smile Monsters!  These would be in a big bowl on my desk if I was still in the corporate world!  A gift for ME and for my clients...can we say stinky coffee breath?

Happy Little Art delivered a Valentine home run with this gorgeous see-thru red envelope package.  Isn't is the sweetest?!?!

You must go to Three Pixie Lane and open this lunch box! I stole some ideas for my son's Valentine's lunch...you will, too!
Oh!  You must read her post to the end...it has a surprise ending!!
Too cute!

Last but not least, these little strawberries from Craftberry Bush are just the sweetest little packages EVER!
Wouldn't they be cute party favors for a baby shower or a Strawberry Shortcake party?

Thanks again to everyone for sharing their wonderful ideas!
Don't forget to come back next month!!
If you were featured, please feel free to grab a button!

I Was Featured Pretty Packages Party


Smiles!!!

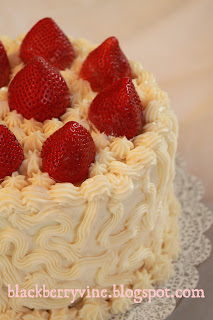
Fresh Strawberry Cake with Cream Cheese Frosting


This cake was created to celebrate a 40th birthday.
The birthday girl's only request was a stawberry cake with cream cheese frosting.  It didn't matter to her what it looked like, she just wanted it to taste good.  Well, tasting good is always my top priority, but I really like for it to look good too!
If you know anything about my cakes, you know I just hate to deliver a short cake...don't know why, I just do.  Tall cakes just look prettier to me.
Soooo, to make this two layer cake have a little more impact I made it a four layer cake.  (To those new to baking...I'm not a magician, I just sliced each layer in half horizontally...really, someone would send me an email asking me how to do it...which is ok, just saving myself some time on the front end.)
I added fresh strawberries between layers of cream cheese frosting between layers of cake.
Rumor is that it was the best strawberry cake they had ever had.  
Poteet Strawberry Festival Cake
2 1/4 cups flour
1 1/2 cups sugar
3 teaspoons baking powder
1 teaspoon salt
1 3-ounce package strawberry gelatin
3/4 cup vegetable oil
4 eggs
1 10-ounce package frozen sliced, sweetened strawberries, thawed
(or 1 pint fresh berries, sliced and mixed with 1/2 cup sugar)

In a large mixing bowl, combine all ingredients.  Beat at medium speed for 2-3 minutes until well blended.  In two greased and floured 9-inch round cake pans, pour the batter and bake 30 to 40 minutes in a preheated 350 degree oven.  (Use toothpick method to check for doneness.)  Cool 10 minutes before removing from pans. 
Serves 12 - 16


Enjoy!
Smiles!!!

Linking to:

Tuesday, February 15, 2011

Tuesday To-Do

This is my almost weekly post of items I want to remember "to-do."
You may find a few items you'd like to remember to-do, too!

I had to put this on my Tuesday To-Do list so I can remember how to make it next year if given the chance.  Courtney at Between U & Me created this amazing valentine card holder...wow!

My (in my head) blogger friend Christy at Glitter and Gumdrops made this adorable heart wax paper via Martha Stewart.
The possibilities for this are endless...she also shares her bread recipe!

Have to remember to make these Jr. Mint Valentines from A Love 2 Create next year!


Happy Tuesday!
Smiles!


Thursday, February 10, 2011

Photo Valentine's Cards with Cake Pops


Of course I HAD to make some of these! 
I've seen them all around blogland (even put one on my Tuesday To-Do post!) 
Since Jack is still in preschool, I can send the cake pops.  Next year, it will have to be suckers or some other peanut free candy.


We also tried another version...didn't quite turn out the way I'd hoped...lips are too big, but still cute.


Smiles!!!


Linking to:

Wednesday, February 9, 2011

Valentine Cake Pops

Well, I finally got this blog thing straightened out (sort of.) I'm not sure what's going on with the posting...its different from before. If anyone has some answers, I'd love to hear from you!

On to the post...

Valentine Cake Pops!


Here are this year's Valentine's Pops.


 Jack is taking them tomorrow with his Valentines.  I'll post his Valentines next.
Happy Valentine's Day (almost!!!)


Linking to:

AAAUUUGGHHH!

My background expired, thus my whole blog is out of whack!  I'm trying to fix it, but I am slightly challenged when it comes to all of this...please bear with me...I like for things to look pretty.

PS.  I still love Shabby Blogs....lots!


Weak smiles!

Tuesday, February 8, 2011

Tuesday To-Do


Coconut Raspberry Cupcakes at 30 girl

Red Velvet covered cookies by 3 Four and Under

Forever Decorating has great ideas...I think my parents have a similar piece in storage...I want it! ****For My MOTHER:  PPPLLLLEEEEAAAAASSSSSEEEE! ****


First A Dream found some great ispiration on the internet...I'm needing to cover some dining chairs thanks to my sweet MIL!  (She really is sweet...she bought them for us!)

(no photo)
Valentines at Cupcakes Kisses 'n Crumbs
lips on s sucker!  cute!

Have a happy Tuesday!!
Smiles!!

Monday, February 7, 2011

More Soccer Cookies!


This week, I had the honor of making these cookies for Wakeland Girls' Soccer Team.
Go Wolverines! 


These close ups may be TOO close up...you can see all of the little ridges & bumps.
Guess my royal icing was a little stiff...it was raining so I hated to make it too loose for fears it wouldn't dry in time!!  The white is soooo smooth...but took longer to dry.


Packaged in little cellophane bags and organza ribbon.
Wanted to use orange & navy raffia, but couldn't find any.
Strange, given its one of the local high school's colors. 


Smiles!


Linking to:

Sunday, February 6, 2011

Pretty Packages Party #6


Valentine's Day is fast approaching...I'm loving all the sweet valentine ideas out there. The pink packages I've found are just gorgeous. The elegantly wrapped gift above is from Sande Chase's most beautiful blog  A Gift Wrapped Life.  The flowers are actually from a package of invitations she never used. Isn't that silk ribbon just YUM?!?!


You had to know, Martha has some beautiful pink gifts, too!  The packages on top are from an all pink shower...sweet!  They're all a little different, but they look so beautiful together.  Did you notice the Neopolitan striped one? 
Aren't the flowers on the packages below gorgeous?!?  They are a gift all by themselves!!
Its a beautiful centerpiece and table.  (The pink walls don't hurt the overall effect either.)
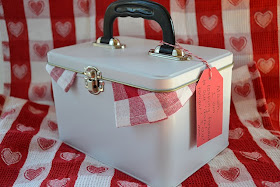
  The party favor cake boxes, the wine labels, the LOVE folding boxes and the little match box favors are all drool worthy!!

Now its time to share your pretty packages!

This is a PRETTY PACKAGES PARTY so what I'm looking for is beautifully, interestingly, creatively wrapped gifts. The gifts could range from individual gifts, to party favors, to food gifts to birthday presents, to any type of gift or packaging! At the end of the week (if I can wait that long,) I'll chose my favorites to share with everyone.

Please be sure to add your permalink below, and not your general blog address. To get your permalink, click on your post name, then just copy and paste the address that shows up in the address bar at the top, into the "url" box for the picture linky. You'll also need to put your e-mail address in, but don't worry, it will not be visible to anyone.

It would be fantastic if you would include the Pretty Packages Party button in your post, to make it easy for others to find your Pretty Package post. To do that, just copy and paste the Pretty Packages Party button to your computer or grab the html code from underneath the Pretty Packages Party button on my sidebar. A text link under your post is great, too!

The Blackberry Vine


Please include a link in your Pretty Packages Party post back to the host blog, The Blackberry Vine. Why is this important? When you include a link back to The Blackberry Vine, it ensures your regular readers/visitors will find the other gorgeously wrapped gifts linked to the Pretty Packages Party. If everyone links back, this maximizes the opportunity for visits for all who participate.

Please do not add your link below, until your Pretty Packages Party post is actually published to your blog. Another helpful hint...DO NOT type in all caps...it makes it very difficult to read! Thanks!

Last, but certainly not least, please comment on the post in front of you and behind you (and any other post!!)...spread the comment love!

Have fun and thanks for stopping by!!!


Smiles!

Friday, February 4, 2011

Six Week Raisin Bran Muffins

Simple and simply delicious!
These are great for busy mornings.
Eat them at the table or send them out the door!!
We like them with an over-easy-egg on top!

1 (15 oz) box Raisin Bran
1 cup melted butter
3 cups sugar
4 eggs, fork beaten
1 qt buttermilk
5 cups flour
5 teaspoons baking soda
2 teaspoons salt

 Mix all ingredients together.  Bake at 350 degrees until brown.  (Freshly mixed will take less time than muffin mix out of fridge.)  Mixture will last 6 weeks in fridge.  (I put plastic wrap right on surface of mix to help with discoloration...does not affect muffins.)

Enjoy!


Smiles!!

Linking to:

Tuesday, February 1, 2011

Valentine Angels Pillow

As you could see from my Tuesday To-Do post, I was really wanting to make a pillow.
Since we are frozen in here, I couldn't just run down to the fabric store to get some felt so I had to make due with supplies I had on hand. (Left over fabric, freezer paper, ribbon and a printer.)

This adorable graphic was found at Old Pixels.  I uploaded it to Photoshop and added our initial.
Then I ironed the paper and freezer paper together.  Using a piece of 8.5" x 11.5" cardstock as my guide, I cut the fabric/freezer paper to fit the printer.  It was amazing out beautifully it worked!
***NEW***

I then made a simple ruffle with my ribbon & sewed it all together.  (I just love a little leopard!!!)
Anyway, if you haven't tried the whole freezer paper idea...do!  Its so fun!


Smiles!

Linking to: