Friday, February 26, 2010
Strawberry & Chocolate Cake Balls
OK, so I admit it, I'm addicted to cake balls and the pursuit of the best combos.
Here I tried the strawberry cake mix with strawberry frosting and chocolate coating. (For recipe look in my blog under Valentine Cake Balls.) They taste good, but still, the red velvet are the best. The strawberry has an "artificial" taste...I think next time I'll try an actual cake recipe to see if it turns out better. One hint if you're making light colored cake balls - trim the crust with a serrated knife before processing in the food processor. It makes a much prettier inside. Enjoy!!
Labels:
cake balls,
dark chocolate,
pink cake,
strawberry cake balls
Monday, February 22, 2010
Even MORE cake balls!
I had some extra chocolate after playing around with some extra cake balls. The idea for this heart came from a segment I saw on Regis & Kelly. Very easy to make chocolate hearts! Just make two "squirts" of chocolate next to each other. Then, with the back of a spoon pull them down until they meet in the shape of a heart. Sprinkle nuts, candy, cherrios, really anything on top. Yummy!
Labels:
Cake,
cake balls,
CAKES,
chocolate,
red velvet cake balls
MORE CAKE BALLS!!!!
So I took some red velvet cake balls to a friends birthday party. I've got to tell you, I'm even shocked at how good they are for WHAT they are!! Here is the recipe for all of those sweet, new friends that want to try it themselves!
1 box of cake mix (I use Duncan Hines Red Velvet,) prepared according to directions (I bake mine in a 9 x 13 pan)
1 can of cream cheese frosting (I used Betty Crocker)
1 lb of candy melts (found at Hobby Lobby)
After cake has completely cooled, cut into large chunks and put into food processor. Process until a fine crumb. I usually do this in about 3 batches. Then mix in 3/4 can of frosting. Combine completely. Follow the steps illustrated below. If you have any problems, call me! Enjoy!! Here are the finished cakes balls...so pretty!!
This is how the cake/frosting mixture looks after being mixed together. Note you don't see any white cream cheese frosting. Using a scoop helps keep your hands cleaner and the balls more uniform in size.
Rolls the balls and place on a cookie sheet topped with wax paper or parchment paper. Place in the freezer for an hour or more to make dipping easier.
I used the white candy melts from Hobby Lobby. Melt in double broiler or place glass bowl on top of large sauce pan of boiling water.
The way I found to make them look the smoothest and cover all sides was to dip them twice. First dip them down as far as you can without getting the candy on your fingers. Hold them up until they start to set, then place on cookie sheet. To make a perfectly round ball, hold it until it sets before placing on sheet. It is easier to dip the other side, though, if you have a little bit of a "rim" to hold on to.
Labels:
cake balls,
how to make cake balls
Cake Balls for Valentine's Day
Cake Ball Recipe
1 cake (made from a mix makes it super easy!)
1 can of frosting
candy melts
While searching the Internet for some cute ideas for Valentine cupcakes, I found the recipe for cake balls. It is so easy, not to mention they taste great!!
I used a dark chocolate cake mix and cooked it the night before (hint from another blogger.) The next day, I cut the cake into large pieces. Instead of crumbing it up by hand, I chopped it up in the food processor. It took a couple of batches, but it was quick and easy. In a big bowl I put the cake crumbs and about 3/4 of the can of frosting (I used fudge frosting.) Then just mix with a spoon until well blended.
Put some wax paper or parchment paper on a cookie sheet. Then, using a scoop, start making the balls. Using a scoop helps keep them uniform in size and reduces the mess on your hands. Roll the balls in your hand and set on cookie sheet. At this point, you can put cookie sticks in them to make "cake pops." The sticks make dipping them in the candy way easier! Just be sure to put the stick in before you pop them in the freezer. Once you have them all on the cookie sheet, put them in the freezer. Some blogs I saw said to put them in the freezer for 15 minutes or the fridge for a couple of hours. I tried putting them in the freezer for 15 minutes because I couldn't wait to start dipping them. This worked fine, but leaving them in longer was better. I didn't have time to finish dipping them all at the same time, so I had to leave some in the freezer for an hour or two. This made dipping in the candy much easier.
To make the balls I tried a couple of different ways to dip them, but finally found a way that worked best for me. First I dipped the bottom half of the ball (the flat part of the ball where it was sitting on the cookie sheet) in the melted candy. I try to dip it in as far as I can without getting it on my fingers. I hold it out of the candy for a while, then place back on cookies sheet. By the time I get through with all of the balls, the first ones have hardened. Then I dip the other half into the melted candy, holding on to the already dipped part. I set it back down on the already hardened bottom half. They are smooth and perfect looking!
Wait to decorate until they have all hardened. Just melt the color candy melts you want, put in zip top sandwich bag and snip off a small part of the corner. For the pink cake balls, after I dipped them them in the pink candy melts, I dipped the tops in white chocolate, put a candy heart in the middle and topped with nonpareils. Thought those were particularly cute.
Once I started making these, I haven't been able to stop! I made more with red velvet cake, cream cheese frosting and white candy melts. Crazy good!! Also, I added a little Nutella to some chocolate ones...just enough to make it a little more interesting (reduce icing by amount of Nutella.)
You should definitely try these scrumptious treats...you'll get lots of raves!! Good luck!!
Labels:
cake balls,
chocolate,
Valentine's
Sunday, February 21, 2010
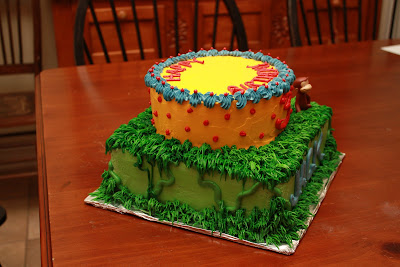
Curious George Birthday Cake
I think this is one of my favorite cakes. Its so colorful and fun. Oh! Its tasted pretty good, too!!
Labels:
Cake,
CAKES,
Curious George,
Curious George birthday cake,
Jungle cake
Curious George 3rd Birthday Party Invitations
I made these party invitations out of yellow felt, fabric paint and t-shirt iron on paper for ink jet printers. They're in reverse...you peel the banana to find the party details. Under George it says, "Are you Curious?"
Valentine's Rice Krispy Snacks
We gave these as valentine's one year. So cute yet so simple. Just add red food coloring to the marshmallow/butter mixture before mixing with rice kripies. Then cut out with heart shaped cookie cutter. SIMPLE!
Smiles!!!
Linking To:
Take A Look Tuesday
Get Your Craft On
Labels:
hearts,
Rice Kripy Snacks,
Valentine's
Pumpkin Extra Large Sugar Cookies
I made these for a preschool class one year. The photographs don't show how sparkly the personalization on the cookies really was. They made me think of Cinderella pumpkins. The little kids really loved them!
Halloween Spider Tootsie-Roll Pops Party Favors
Spiderman 4 Year Old Party Invitations
The spiders were connected by filament to the bug box under neath the vellum invitation.
Pretty Pink Birthday Cake
I made this birthday cake for my sweet friend's little girl. She was having her party at one of the princess-type dress-up places. I think my friend used some long sparkler type candles on top.
Labels:
Cake,
CAKES,
girl birthday cake,
pink birthday cake
Cowboy 2 Year Old Party
Tags for party favors
Cowboy boot cake and invitation. Party details were on card that slid into boot topped with bandana print tie. To make part of the boot look like suede, I dusted it with cocoa.
Subscribe to:
Posts (Atom)