Galations 5:22

But the fruit of the spirit is love, joy, peace, patience, kindness, goodness,
faithfulness, gentleness, and self-control.

Galations 5:22

Looking for the TUESDAY TO DO PARTY?

The Blackberry Vine
CLICK PICTURES FOR CURRENT PARTY

Tuesday, August 31, 2010

Felt Pumpkin People

Surprise!  I found another amazing craft on MarthaStewart.com
 Click here for some Martha craft inspiration.  
The original creations are by Jennifer Murphy.  She makes the most amazing stuffed animals and now ceramics.  You will be inspired by her beautiful site.

This is my first attempt at a Felt Pumpkin Person using most of the directions provided on Martha's website.  Click here to try it yourself.
If you've reviewed the tutorial provided by Martha, you'll see there are a few differences (besides the quality...aren't Jennifer's amazing!)  First, I couldn't find velvet leaves at my handy dandy Hobby Lobby.  Just used the ones they had in the bridal section.  Also, I had lots of  polyester stuffing.  I took a look around HL for the wood shavings filler, but couldn't find any. That really worked out best because I need to use what I have.
For some reason, my felt circles are two different sizes, but look the same stuffed.  I'll make some adjustments next time.  (which will probably be later today!)
I have my orange felt soaking in my left over morning coffee as we speak.  Another idea I'm going to try is giving that little leaf some glitter.  Stay tuned!
BWS tips button


Get Your Craft On Tuesday
SYS Thurs
Follow Me on Pinterest

Monday, August 30, 2010

Meet Will

Photography is another hobby I enjoy.  It took me awhile to make the change from film SLR to digital SLR, but now I love it!  So does my husband as I can take TONS of photos without the cost of developing them all!

Besides my children, my next favorite subjects are my dad's longhorns (Will is the little baby on the left in photo below,) my brother's cattle and MY rooster, Jeff (technically he lives at brother's ranch, but other than that, he's mine.)

The shots below are of Will, one of a pair of  about 2 year old steers that live with my parents.  (They were a gift from my brother.)
Mom refers to them as "yard art," but Dad wanted them for a purpose.  He enjoys participating in Texas Historical Reenactments like the Battle of San Jacinto.  One day he hopes to have them pull a cart at one of those.  If it happens, you'll be some of the first to know as these steers are a lot more like a couple of Golden Retrievers than draft animals.

  Anyway...here's Will.  The top photo is one of my favorites of him.  I really like the setting sun lighting his ears and horns through the pines.  It's also interesting to see how their horns change as they grow.  The first photo was taken in March and the bottom photo was taken in August.  In the August photo you can see how they're starting to point up and out.  Can't wait to see what he looks like a few years from now.

WILL ~ MARCH
WILL ~ AUGUST

What do you love to photograph?

Sunday, August 29, 2010

iVillage

Wow!  I'm blown away!  iVillage chose one of my post to share on their website along with several other cute craft ideas.  Go check it out!


smiles!

Saturday, August 28, 2010

Purple and Turquoise Cake

~Purple and Turquoise cake for 19 year old girl's birthday~

Friday, August 27, 2010

Apple Pie Bars

These Apple Pie Bars are so good! I found the recipe in this month's Family Fun magazine.  It was developed by one of their staffers, Sandy Wickland AND it is amazing!  Her original recipe has the directions for making the pastry which will fit in a jelly roll pan.  I couldn't wait to make the pastry so I used refrigerated pie crust and made them in a 13.5 x 9.5 Pyrex pan.  Worked just fine.  Here is my abbreviated version:
Ingredients:

Refrigerated Pie Crust

Filling
1 3/4 cups cornflakes, lightly crushed
8 cups peeled and slicd cooking apples (her recipe recommends McIntosh/I used Granny Smith)
1 cup sugar
1 1/2 teaspoons cinnamon
1/2 teaspoon nutmeg (freshly grated is worth it)

Topping
1 egg, beaten
2 tablespoons sugar
1/2 teaspoons cinnamon
1 cup confectioners' sugar
2 tablespoons milk
1/2 teaspoon vanilla extract

Heat the oven to 350 degrees.
Roll out one portion of refrigerated pie crust to cover Pyrex dish. 
Sprinkle with crushed cornflakes then top with sliced apples.
Mix sugar, cinnamon & nutmeg in small bowl then sprinkle over apples.
Top with other pie crust (rolled out to fit.)
Brush beaten egg over top of dough.   Sprinkle with sugar/cinnamon mixture under "Topping."
Bake until pastry is lightly browned about 45 minutes.  Let it cool for one hour.  Mix confectioners' sugar, milk and vanilla extract to make a glaze.  Drizzle on cooled pastry.  Cut into squares.  (You'll be amazed by how cleanly these cut!)

Enjoy!

PS.  If you don't already subscribe, you should definitely check out the Family Fun website.  It has tons of great ideas for families and kids!

Thursday, August 26, 2010

Getting to Know the Teacher


When H was in preschool, you could request an info sheet on the teachers.  It was just a little sheet containing information we could use when it came time to give teacher gifts.  Many of us would go in together to get the teacher a gift card to her favorite store or restaurant.  Sometimes we might bring an extra latte for her when we dropped of the kids.  The teachers all seemed to really appreciate the little unexpected surprises. 
Today I sent this little form to school with H.  As I get to know more parents in his class, I can share it with them, too.
It is easy to make your own, but you can use the one I made.  Just fill in the teacher's name and your child's name.  Easy peasy!
smiles!!!
Teacher Tidbits

Click here to print your own Teacher Tidbits

***UPDATE***  Sept 2, 2011
Click here to see updated version of the Getting To Know the Teacher Page

Linking to:
Whatever Goes Wednesday at Someday Crafts
Blue Cricket Designs
Hooooooos Got Talent at Night Owl Crafting
Strut Your Stuff at Somewhat Simple
Show Off Your Stuff at Fireflies and Jellybeans
Motivate Me Monday at Keeping it Simple
Craft-O-Maniac Monday

Wednesday, August 25, 2010

Book Boxes for School & Home

The Kindergarten Team at Haden's school sent out directions for the parents to help the children make book boxes out of large cereal boxes.  They'll keep the books that make at school in them. 
Here are the directions we recieved:
1.  Find a large cereal box and cut out the side that tells the nutrition information.
2.  Tape the original opening shut.
3.  Decorate the box however you and your child wish!  For example, use wrapping paper, paint, contact paper, stickers, sequins--anything you want to create a unique box!
4.  Write your child's name on both narrow sides of the box.

Well, as I said a few days, ago, I think I'm developing a Mod Podge addiction.
I started cutting up tissue paper and applying it with Mod Podge to the cereal box.  It takes several layers to cover up the cereal box.  Helpful hint...less is more with the Mod Podge.  Let each layer dry before adding more.  Since we've had 24 days here of above 100 degree temps, I just set mine outside to "bake."  It would probably be better to just take your time.  After all of the tissue was applied and dried, Haden drew a picture of his favorite book.  I cut it out an applied it to the box as well.  Something else I should have added to the bottom of the box (and will hopefully remember to add later, is  his teacher's name, his school's name and the school year.)  This box will also be a great place to keep school keepsakes when the year is over.

Monday, August 23, 2010

A Mom's Prayer on the First Day (and every day) of School

We took Haden to his first day of school.  He eagerly went inside, got set up and started on his first activity.  We are so thankful for his teacher, Mrs. Stanton...she's a good Aggie which equals good person in my book!


As soon as we got back home, I started picking up and thinking about the projects I could accomplish while I have a little free time.  While sorting through a pile on my craft table, I came across this prayer.  (Isn't God good?)  The sweet teachers/directors at Sonshine Academy shared this with the parents one year...now I'm sharing it with you.

Here we are again, Lord.  Their backpacks are loaded and their faces are scrubbed and their lunch accounts are full.  And I know you'll walk with them, Lord.  You always do.  But a mom still has to ask.  Will You walk with them?  Will You whisper to them what they need to hear, when I'm not there to whisper it?  Will You please, oh please, cover their school with the protection only You can give, and will You keep harm far away?  Will You make their minds strong and ready to learn?  Will You help them understand that hard work honors the One who created them?  Will You guide their teachers, giving them patience and wisdom and creativity and even more patience?  Will You bless them for their efforts?  Will You love all those children there, the ones whose lunch accounts aren't full, the ones who feel alone?  Will You teach my children to be kind and unselfish and to love those who are different from them?  Will You point them back toward home just as soon as you can?  Lord, I give them to You today and everyday, trusting them to Your care.  Amen.

Praying you and your family have a wonderful and blessed school year.

Smiles!

Lego Star Wars School Box

Before...BO-ring.

After...AWESOME!

Inside...a few inspiration quotes for the newly minted Kindergartener.

(Please keep it to yourself, but I think I'm developing an addiction to Mod Podge...wait til you see what I've got to show you tomorrow.)

Smiles!

Linking to these fun parties:

Sunday, August 22, 2010

Back to School Treat

Ok, I'm asking you to please bear with me as I share a few back-to-school crafts over the next few days.
These pencils are what I'm sending with my eldest to his first day of Kindergarten.  I saw this idea in the September 2010 publication of Creating Keepsakes.  It was created by Jaime Ward from an idea she saw on scrapmatters.com.  I haven't had the time to check it out, but after I get this boy off to school, I'm going too!  Happy Back to School!

 Update:  A printable pattern for Valentine Pencils has been added to my ETSY store.
I'm also offering a Custom Printed Pencil Printable.
Check it all HERE!
Or, a BLANK PATTERN HERE!
 
 
To make your own:
3 1/2 " x 4 1/2 " yellow cardstock
pinking shears
3 1/2" x 1/2" pink cardstock
1" circles pink cardstock
3 1/2" x 3/8" aluminum foil
Rolos
Hershey kisses
adhesive
 
UPDATE:  Would you like a pattern & directions to make it a little easier??
Would you like a customized pencil printable??
Stop by my ETSY shop HERE


Linking to these great parties:
Show off Your Stuff at Fireflies and Jellybeans
Under $100 at Beyond the Picket Fence
Fingerprints on the Fridge
The Shabby Nest
Its a HodgePodge Friday
Look at Me at Fun to Craft
Frugalicious Friday at Finding Fabulous
Weekend Wrap-up Party at Tater Tots and Jello
 Saturday Spotlight at Craft Envy
Everything but the Kitchen Sink at a Little Knick Knack
Mad Skills Monday at Support Blog for Moms with Boys
Just Something I Whipped Up at the Girl Creative
Making the World Cuter
Market Yourself Monday at Sumo's Sweet Stuff

Follow Me on Pinterest

Saturday, August 21, 2010

Swiss Meringue Buttercream

I've had a few requests wanting to know about Swiss Meringue Buttercream.  When I need white frosting to decorated a cake, I use Swiss Meringue as it uses the egg whites as opposed to the egg yolks is classic French Buttercream.  It still has a slight yellow tint to it from the butter, but as you can see in the photo, it still appears pretty white.
To Make Swiss Buttercream You Will Need:
a hand-held mixer
stainless steel bowl
skillet deep enought to hold 1-inch of simmering water
instant read thermometer
4 large egg whites
3/4 cup granulated sugar
2 tablespoons water
1/4 teaspoon cream of tartar
1 teaspoon vanilla
stand mixer
3 sticks butter, unsalted

To Make Swiss Buttercream:
Have all ingredients at room temperature.
Bring 1-inch of water to simmer in skillet.  (You may need to adjust to deeper water level as you will want the water to be the same depth as the egg mixture.)
Whisk together egg whites, sugar, water and cream of tartar in stainless steel bowl.
Beat egg mixture with hand-held mixeron low  until temp reaches 140 degrees on instant read thermometer.
(Be sure to rinse thermometer in simmering water between readings as you do not want to contaminate egg mixture.)
Once it reaches 140 degrees, continue beating on high until the temp reaches 160 degrees.
Remove from skillet and add vanilla.
Continue beating on high until mixture is cool and holds glossy peaks.
In another bowl in stand mixer, begin beating butter until creamy.
Add a little bit of meringue at a time until incorporated.
Continue to beat until fluffy.
This can be made ahead and stored in the refridgerator for 5 days or frozen for several months.

(To use frozen buttecream, break off pieces into microwave safe bowl.  Set on defrost for 5 to 10 seconds at a time until desired consistency.  If you get it too soft, just put back in fridge.)

Enjoy!


Friday, August 20, 2010

Pool Party Invite

Last week I guest posted over at Sugar Bee...just in case you didn't get there to see it, here is the replay...
The finished invitation...just in case you aren't interested in how its done...
To make the invitations as shown, you'll need:
fold-over note cards
large oval punch or oval cutting system
blue vellum
pinking shears
tacky glue
a printer
embellishments

First I printed out the invitations on the inside of the foldover notes (they're on sale right now at our Hobby Lobby.)
I tried to my best to center it, but its a little off.  It's ok, I just need to be sure I note that when cutting the oval on the other side.
Using my trusty Creative Memories cutting system, I cut an oval on the front of the fold over note.  This is the window that the invite information will show through.
Next, I measured the blue vellum, then used scalloped pinking shears and made the decorative edge.
I attached the vellum with tacky glue just around the edges.
Then I attached the top of the card to the bottom.
To finish it off, I simply added some embellishments I created from my Cricut.
(I just realized I forgot to add the rhinestones for air bubbles coming out of the fish's mouth...oh well.)
These are quick,easy and inexpensive invitations for your next pool or beach party.
Smiles!
Jami

Linking up to these fun parties:

Sunday, August 15, 2010

Pink, Orange and Green Birthday Cake

3 Tier 6 layer girl's birthday cake. 
Bottom tier is butter cake with buttercream filling, middle tier is fresh strawberry cake with strawberry filling and the top tier is chocolate cake with chocolate filling.
Cake is frosted with Swiss Meringue Buttercream and Classic French Buttercream.
Back of cake
Cake with cupcakes.

Sharing at these fun parties:

Saturday, August 14, 2010

Hot Pink Zebra Cake

3 Tier 6 Layer Birthday Cake with French & Swiss Meringue Buttercream Frosting.
Top Layer is "zebra cake," middle tier is chocolate cake with dark chocolate filling and bottom layer is vanilla cake with buttercream filling.
Close up
Back of cake
Follow Me on Pinterest

Friday, August 13, 2010

Guest Posting at Sugar Bee

Hey there!  Mandy over at Sugar Bee Craft Edition invited me to guest post on her site.
She invited several different bloggers to guest post for an amazing two week guest blog extravaganza!
Above is a preview of my post. 
Its a little tutorial on a Martha Stewart inspired party invitation!

It would be great if you could take a moment to check out my post and to visit her lovely blog.


Smiles!

Mini Care Package - Day 3

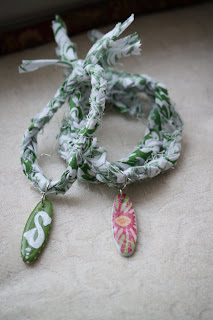
Did you happen to see the article in the August edition of Living by Martha Stewart?  She had an interesting article about braiding fabric, yarn & leather.  She used the braids for shoe strings, belts, bracelets, and cording.  Since I had some fabric left over from the fabric flower I  made my goddaughter earlier this week, I thought I'd give it a try.  The braided fabric makes a pretty cute little bracelet for her to wear at camp.

I also noticed a tutorial at Fireflies and Jellybeans using Mod Podge Dimensional Magic to make charms and ring toppers.  It looked pretty cool, so I thought I'd give it a try, too.  You can find it here.
Since sweet goddaughter's bracelet turned out so cute, I used the left over fabric braid to make myself a double wrapped bracelet.  Pretty cute!
smiles!
Jami

LinkWithin

Related Posts with Thumbnails